

Introduction:

In our first post, we discussed about how we create a basic streamlit application and then actually we showed a nlp usage data application and showed how it is working. In this post, we will discuss how to setup layout of apps and deploy apps via streamlit share. Let's dig in.
What is a layout?
The layout refers to the structure of app front end. We study layouts and specifically fix each and every small component of an app. The reason for creating, studying and actively "optimizing" layout designs is to create the best user experience for every user of the app. The details of such topics are obviously out of scope for this article; but as the meaning of layout in this context is established; let's proceed with how to create different layout elements of app in streamlit.
How to create different header type elements?
There are different header type elements possible to create in streamlit environment. These are: title, header, subheader. Let's discuss these briefly.
(1) title: st.title() helps to create a title tag element in the streamlit app. i.e. for example, writing st.title("this is layout test app") creates a title for the app.
(2) header: st.header() helps to create a h1 tag element in the streamlit app, i.e. for example, writing st.header("this is app header") creates a h1 element reading "this is app header" in the app.
(3) subheader: st.subheader() helps to create h2 tag elements in the streamlit app environment.
How to create sidebars?
In streamlit, we can create a left sidebar in the app; so that we can keep most important stuff in the center of the app; while lesser important components are put in the left sidebar.
To add one specific element inside left sidebar; we can do it using st.sidebar.element_name. element_name refers to the normal name of the component as a streamlit api. So basically to rephrase it, you can add a sidebar between st and the element_name of an API; and make it to go into the sidebar. Only elements which are not enterable there is st.echo and st.spinner.
For example,
add_selectbox = st.sidebar.selectbox(
    "How would you like to be contacted?",
    ("Email", "Home phone", "Mobile phone")
)
This adds a simple selectbox in the sidebar of our test app. Now, there are some beta features too; which are more abstract layout elements. Let's get to them now.
How to create a container inside a streamlit app? [beta feature]
Now important thing to understand here is that container means a part of secluded content; i.e. padded singled out part of content inside a big application.
A container is generally created in html to create classes of similar content, define styles for them, insert elements into them dynamically as well as out of order, by referencing the container.
In streamlit, we can create multiline containers; using the st.beta_container() api. Now, there are two ways to insert elements in a streamlit container. First one is the with pattern and second one is creating the container by name and then referring it.
Important part to understand is, st.beta_container() creates a class which denotes as a container and that container has all the normal app component apis available from it. i.e. as you know st.write() is an available api; so is container.write() if say you initiate a container using container = st.beta_container()
So the two different ways to create and insert elements in containers are:
(a) using with:
with st.beta_container():
    st.write("this is the with method")
    st.write("disadvantage is reference is not possible")
(b) using named containers:
container_cr = st.beta_container()
container_cr.write("this is name-referenced container")
st.write("see how this is printed later")
container_cr.write("this is better method")
Now let's see how this span out in the app below:
So clearly, if you are sure of all the elements you want to put into the streamlit container; then you can create the container using "with" while for a dynamic container; follow the named container method.
How to create elements occurring side by side in streamlit?
In apps, sometimes we create multiple elements appear side by side and it is an important part of layouts. In streamlit, this is done by beta_columns. Using beta_columns, we can make multiple containers appear side by side; with or without a width ratio division of the total width of the app screen.
You can either provide a spec/int or a list of integers as parameter to st.beta_columns(). If provided one integer, the beta columns returns that many number of containers; which you can then fill up as stated above in the container creation part.
An awesome example is provided in the official site; see it.
If you do provide a list of integers to the method beta_columns though, that creates len(list) many containers, having width as accordingly to the list.
How to create collapsable items in streamlit?
Now, let's see our last and final item for layout creation of streamlit apps. This is beta_expander() which creates a collapsable item in the app. A collapsable item means that it is a item which can be expanded and collapsed depending on user's will.
The construct is as similar as the normal container; with one important difference. The difference is that you need to put a label for the item; otherwise you won't know what is it supposed to show the user. There is another parameter, boolean in format, which is "expanded" i.e. whether to initialize the item in the app as collapsed ( expanded = False, the default option too) or as expanded ( True).
So these are the main things currently present in streamlit for designing app layout. There are other subtle choices also which streamlit offers, like hovering, expanding/shrinking graphs/charts and others; without the explicit need to mention it in a code.
So this is how to create better app layout in streamlit.
How to deploy apps in streamlit?
While I am yet to get a streamlit invite for using the streamlit share option, The documented method in official document is to:
(1) upload the code in github with requirements.txt for dependencies
(2) provide that github link to your streamlit sharing account to host the actual app.
These two very easy steps, let's you host streamlit from the streamlit sharing accounts. There are other procedures to use streamlit for teams/ companies; which I guess streamlit is yet keeping on beta.
November 13th,2020:
once I get my invitation ( fingers crossed) I will provide a link to my apps here. Till then! keep reading and stay tuned with me for awesome nlp.
Update on 14th November,2020:
Yay! I got my app sharing invitation. Deploying app for me turns out to be a lot of jobs; as my app included downloading models from spacy too. We will go over how I resolved the issues and also why they occurred but lets first take you through the deployment excitement!
First the invitation mail came to me; which also described in detail how to deploy the app. The procedure is to login to:
Here you need to login via your github email. Then once streamlit gets various authorities to your account ( remember to not provide your office github as this includes reading your repositories); streamlit account will open.
Here you will be provided an option to create new application. Once you click to new app; this will open a form where you get to choose:
(a) which repo the application is in
(b) which branch it is in
(c) what is the file path relative to this directory
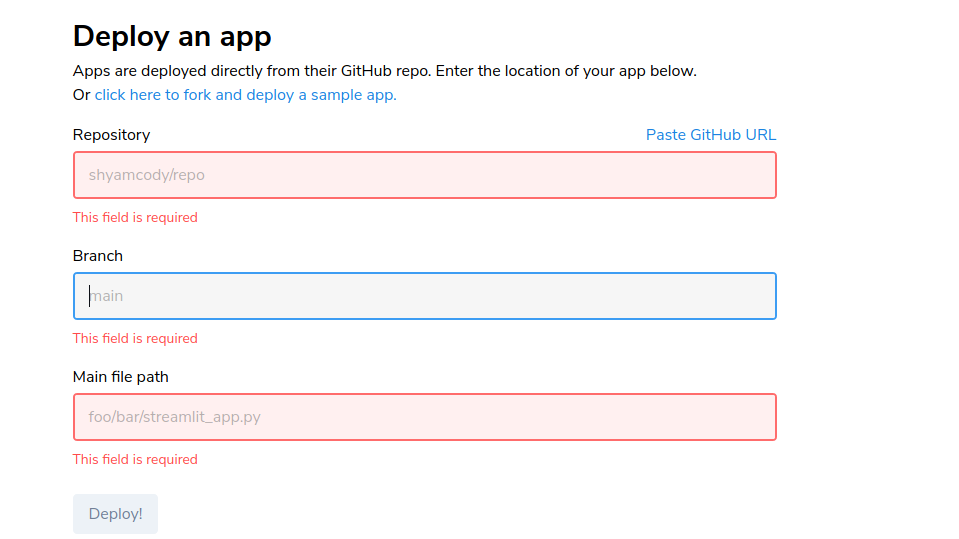
You also have to provide a requirements.txt which needs to contain all the dependencies. If you are already working on a python virtual environment, then great! you just need to write pip freeze > requirements.txt and you are done. If not, carefully pick up the minimal number of packages you need to run the script and then put them into a requirements.txt. For this you may need to check pip freeze and then pick up the versions and the packages as it is from the output.

For example, this is my requirements.txt.
Finally you will have to click deploy and once you do that; your app will be fetched from github repo, and requirements will be downloaded and finally it will get deployed and will become live at:
https://share.streamlit.io/[git-user]/[git-repo]/[branch_name]/[app_script_name]
As I promised, this is my first deployed spacy app:
A fabulous spacy based streamlit app
Now, One minor issue I went through was that I tried to deploy the app first time, it didn't run. First of all, I forgot to put spacy models as requirements. To figure out that I opened how to install spacy models from script. There is a attribute called spacy.cli; but for some reason cli didn't work.
After that, I figured out that from pip freeze itself, there will be versions mentioned for the models I used. And that was true. check it here:

So I entered these as my requirements and finally it worked out. You may get stuck for some other reasons; i.e. if you don't provide the same compatible versions of spacy models as requirement, you will get lexemes.bin not present error. A general discussion on the same topic in stackoverflow can be found here.
So this brings our streamlit series to a halt for now. I will deploy a more complex app later on; and write about it. For now, bye and thanks for reading!
Share about your apps and if you are in luck we can publish your specific app in our site too!
Comments
Post a Comment