

A brief history of CNN:
Convolutional neural networks is one of the most famous neural network architectures which are currently used in deep learning practices and researches. The concept of CNN came into existence from the long line of research which all started with the finding that animal brains have visual receptors with high local similarities of their reception and high overlap of their observation area. This then originated the concept of neurocognitron; and slowly through a decades of research the other concepts related to cnn, such as convolutional layer, spatial invariance, pooling layer and other properties came into picture. In the beginning of 2000, K.chellapia et al. created the final breakthrough; which was a gpu implementation of CNN. This made people realize that how with immense computational possibilities CNNs can come up to great works. There have been many development upon different breakthrough researches. We will discuss them later in this article.
What is CNN?

A CNN is a type of artificial neural network which uses computational layers named convolutional layers to provide importance to local similarities in data and also uses layers like pooling layer and dense layer to further create features. But the main key point in a CNN is the convolution layer; which gives it the edge it has. So to understand what a CNN is, we have to understand what are the main concepts with convolution layer and pooling layers.
What is a convolutional layer and how does it work?
A convolutional layer is a layer of computation where we apply a certain type of filter through out a 3d or 2d matrix of data and then extract lower dimension matrix from that. For example, consider a 28 cross 28 pixel image ( generally the digit recognition mnist image). Now, a filter of size (2,2) can be run through it to multiply to its each (2,2) size segments and then reduce it down to (14,14) size matrix. But to do that, you have to understand how the filter/kernel works to create this matrix.
What is a filter/kernel?
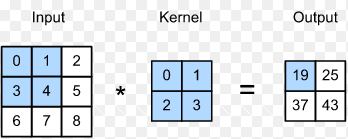
In CNN's convolutional layer, to capture the local similarity, we take matrices of smaller size, generally (3,3) or (5,5) [ normally a odd dimension is chosen] and then we multiply this matrix; with each similar size blocks present in the input matrix. We start from the top left corner and then based on stride number we move to right and to down; as we keep calculating the features.
The multiplication of a (3,3) kernel with a (3,3) input happens a bit differently than normal matrix multiplication. In this case, we multiply A[i,j] with B[i,j] and sum over all the i,j. i.e. it is an element wise multiplication.
Now there is a concept of stride number. Stride is basically how much the kernel moves from one computation to another. i.e. let's say the kernel calculates it's first point in the top left corner of a 28 cross 28 matrix. Now, it may start from 2 unit left or 3 unit left or 5 unit below and so on. To properly fix how much the kernel will shift, we use stride for a filter. stride of 1 means that a kernel basically moves 1 block in left or down and starts the calculation again.
As you can understand, based on stride number, your final output size also changes. If you take 28 cross 28 input image, and then run a (3,3) filter with 2 stride, the output will become (14,14) as par the structure. In the code implementation part, I will describe how to provide input for each of these items i.e. filter/kernel size as well as stride number for a convolutional layer.
Now that we understand the concept of convolution, let's move on to the next important brick in the house named cnn. That is pooling layer.
Now, in case of a convolutional network, it is much important to actually go and select the most important/representative feature from a local cluster. i.e. it is important to downsample from the huge number of inputs and improve the quality during that process. We achieve that by adding pooling layers.
What is a pooling layer?

A pooling layer, takes one output from a pool of outputs. That is the simple logic behind the name pooling layer. Look at the example pic we took. In this example, we apply a Max-pool function to the input. This maxpool of size (2,2), considers each mutually exclusive (2,2) block of the input and takes the maximum value from those block; thus creating a (2,2) output.
Although it is not fixed to use maximum of the outputs while taking a pooling layer; people generally use maxpool while adding a pooling layer.
With pooling layer's concept down, you have only one layer to understand before you go on to add these and create your own cnn. That is the Dense layer.
What is dense about dense layer?

Dense layers, are literally dense i.e. fully connected layers in a neural network. In such a layer, you can fix the number of nodes in output, and it generally follows 1d input to 1d output. i.e. you can't connect it to a 2 dimensional output from a pooling layer or a convolution layer. The specialty about dense layer is that each input layer is connected with each output layer. This special structure let's you capture all the signals possible and historically this type of layer has proven very useful for this reason.

To connect a dense layer in cnn architecture, we first flatten a 2d or 3d input into 1d by stacking each row side by side. From the image it should be pretty clear how it happens. We will discuss keras syntax for doing the same later in this post.
How to put these together?
Now, you may wonder at this point; so I know about convolution layer, and I know about pooling layer; so then I can just put together a bunch of these together and things will work out just fine. The issue with this idea is that although we generally don't mention how the architecture of cnn should look like. But if you take a look at a bunch of SOTA CNN models created in past, like ResNet150, vggnet16 and so on; a common architecture emerges out.
The cnn architecture:
The common CNN architecture is:
(a) add one or more convolution layer together.
(b) top this signal up a bit by a pooling layer following them.
(c) repeat the (a) and (b) together for a few times. Add dropout layers in some cnn layers.
(d) finally add flattening layer.
(e) following the flattening layer, add dense layer.
(f) add one or more dense layer if see fit.
(g) final output layer.

image from researchgate.net
Look at the structure of the vggnet16. This contains 4 convolution stacks, each time followed by one max pool layer and finally followed by 3 dense layers. This structure was successfully trained for imagenet competition and was sota for few years.
So at this point, you know what are the layers a convolutional neural network contains, how do they work and you also have common and successful CNN architecture idea.
So, the question is how can you get stuck from here?
This is just the beginning and there are number of ways to fail from this stage. The first question you will probably get stuck is that why your model is not training. First read up about the activation functions. The classic case with sigmoid activation function can be the vanishing gradient problem.
It is natural to feel enthusiastic, and then you can end up stacking a 16 layer model too. But then when you go forward and try to train it, because of too many layers, your gradient vanishes during back-propagation to its early layers. This results in the loss not reducing and your accuracy getting stuck.
So if your accuracy is not increasing in each epoch, or you are getting stuck in one loss value for multiple epoch, then probably you have too many layers in your cnn model; or you are not using ReLU/leakyRelu wherever possible. If you use sigmoid and softmax in most layers, that can also cause you to get stuck.
So how to proceed with cnn architectures then you ask?
The best way to proceed in such a case is to start with a 4/5 layer cnn model; with 2 cnn, a pool layer and a dense layer maybe. Try ReLU, elu and leakyRelu combinations. Finally once this model starts overtraining, add some more layers; and re-iterate.
How many epochs does it generally take to train your neural network?
I have not trained much of neural networks as of december 8,'20. I have trained nns on digit recognizer, fashion and cifar10 data; as well as trained on a kaggle dog/cat classifier. But from my small experience and researches, generally it takes 5-6 epochs, hell even 3-5 epochs to train if everything is correctly set. It may however take much more time and many epochs for fine-tunings, bigger networks ( like say very deep cnns with more than 20-30 layers); which I can't properly comment on for now. You can read this awesome post by priya dwivedi on how she trained a resnet50 ( 50 layer resnet cnn model) and how you can use her code to do the same. You can play with my dog/cat classification notebook in kaggle.
So this is what the theoretical part of CNN looks like. In the second section of this post, we will briefly write about how these different layers can be written using simple keras apis and will provide examples from my notebook to give you a complete guide.
Coding The convolutional neural network:
In this second part we will thoroughly discuss how to build convolutional neural networks for your experiments using tensorflow and keras. For trying out some ready-made code which we used to detect hand written digit using the mnist data; check this mentorbruh example notebook. Here we have explicitly coded multiple cnn and tried out digit recognition models with near 90% accuracy.
Anyway, let's get back to track. First things first, for creating neural network layered models, you need to import Sequential model from keras.models using
from keras.models import Sequential
And then initiate a sequential model by saying
model_seq = Sequential()
This is as simple as that.
Now, you need to create layers. For creating
(a) convolutional layer, from keras.layers import Conv2D
(b) pooling layer, from keras.layers import MaxPooling2D
(c) dense layer, from keras.layers import Dense
To create a layer actually and to add we have to do the following
model.add(Conv2D(params))
model.add(Dense(params))
model.add(MaxPooling2D(params))
Now, once you do model.add(layer_object) the layer gets created and added to the model as a layer. Now, let's quickly check the parameters we can put into each of these core layers.
(a) Conv2D(filters,
kernel_size,
strides=(1, 1),
padding="valid",
data_format=None,
dilation_rate=(1, 1),
groups=1,
activation=None,
use_bias=True,
kernel_initializer="glorot_uniform",
bias_initializer="zeros",
kernel_regularizer=None,
bias_regularizer=None,
activity_regularizer=None,
kernel_constraint=None,
bias_constraint=None,
**kwargs):
We will quickly discuss the most important parameters. First of all, filters refer to the number of filters we need to apply. This is generally dependent on the output size. i.e. if you want to output 32 by 32 then you have to use 32 filters.
The kernel size if mentioned as single integer n then refers to (n,n) kernel; otherwise given a tuple as the size that is obviously the kernel size. Kernel refers to the convolution kernel we talked about.
strides can be provided as 2d tuple for 2 directions; or if provided a single integer then it is considered to be the same integer in both directions.
padding is an concept we didn't touch in the main content. Basically padding means adding extra cells of values to an input. This is done because when we are applying filters, the rows in the border do not have enough surrounding elements.
That's why we use padding and add extra cells in such positions to solve the issue. The padding parameter, if set to "valid", doesn't use padding and the filters leave the borders; resulting in decrease in output size by (kernel_size -1). If padding is written "same" then padding is done and it results into same size output.
activations is another very core parameter. In the activations, we can provide the name of an activation function which we want to put in that layer. Generally we put 'relu' or Leakyrelu functions as activations. If activation is left empty; no activation is applied in that round.
If you are adding the first convolution layer then you will want to use the input_shape parameter of the convolution layer too. That is basically a parameter where you can put the input_shape of your data so that the convolution layer can properly take input.
Other than these parameters; there are many other parameters as you can see. For starting and modeling simple cnns you don't need them. But if you want to use them, follow the official link of conv2d parameterization to learn more.
(b) MaxPooling2D(pool_size=(2, 2), strides=None, padding="valid", data_format=None, **kwargs):
This is much simpler. There is one main input to put in MaxPooling and that is the pool_size. The pool_size can take either integer or a tuple; but generally we put a (2,2) tuple as that halves the input dimension.
The stride is also not written in general as pool_size then becomes the stride size by default.
For understanding the other parameters, which you will need if you are building advanced cnn models, follow this official link to maxpooling layer.
(c) Dense(units,
activation=None,
use_bias=True,
kernel_initializer="glorot_uniform",
bias_initializer="zeros",
kernel_regularizer=None,
bias_regularizer=None,
activity_regularizer=None,
kernel_constraint=None,
bias_constraint=None,
**kwargs):
The dense layer, generally comes at last,and therefore only two parameters are important in it. First one is units, which refers to how many nodes the dense layer is supposed to have. The second one is activation which refers to which activation function to use in the dense layer.
Interesting enough, if you are creating the last layer of your model in case of classification model; then always put Dense(units = no_of_classes,activation = 'softmax'/'sigmoid'); and if you are creating regression then create, Dense(units = 1). In case of regression you can't put an activation function as that would basically curb the range, letting the model not get trained.
For knowing more about Dense, follow the official link and read about it.
(d) Flatten():
The last thing I needed to mention was Flatten(). We already discussed in the theory part how before adding the dense layer you need to flatten your multidimensional output into one dimensional by taping rows with rows. Flatten() is just the layer for that. To add this also you need to just write:
model.add(Flatten())
So that ends the parameter discussion for the different layer constructions we did. For transfer learning, there is a bit of a difference that needs to be done; but that will be covered in the transfer learning post we are soon coming back with. Meanwhile, check out the awesome neural network practice notebooks we prepared in mentorbruh repo. Do star our repo if you like the notebooks. Please share this article with your peer groups and/or colleagues and comment below to let me know things which maybe bit wrong/ I should have added to better the learning experience.
Thanks for reading!
Comments
Post a Comment