Introduction to chatbots: what, why and how?

                  Introduction to Chatbots

Introduction:

Chatbots are every where in the current industry with starting from automated reply bots, from website greeting chatbots, to zomato's complaint chat bot and upto sophisticated companion ai chatbots in chatting apps. Building and discussing about chatbot is a part of natural language processing, understanding and generation task. In this article, we will describe the basic ideas of how chatbot works, what are the different parts, and we will vividly draw inspiration from the google developer course taught by priyanka verdegha called "deconstructing chatbots."

Summary of the article:

In this article, we will go through the concepts of what is chatbot, how dialogue works, what are intents, context, and, how the actions are performed by chatbot. This is the first of the chatbot series which I will be writing over january 2021. This post will mainly discuss around understanding the concepts, while in the next posts, we will create chatbots using dialogflow and RASA NLU framework which is famous for creating chatbots.

what goes on in the back of a chatbot?

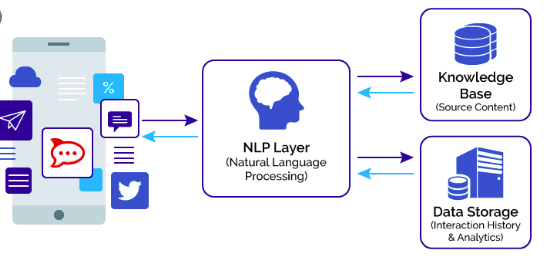
Ever wonder? what is going on in the back of that small chatbot which springs up when you enter a new website; or when you want to log a complain in an automated site and other things. There is a normal 3 layer structure inside a chatbot. Look at this picture from bigdatamadesimple.com below:

nlp chatbot structure with 3 layers, front end, nlp processing part, back end

So, there are basically 3 parts of the chatbot programs. These are:

(1) front end of a chatbot:

This is the part, generally end users see. This is a chatting interface, either in a website or some social media or some app interface. Here the users provide their chat response and get the responses from the chatbot back.

(2) NLP layer or the chatbot engine:

This is the most important part. Here, a natural language processing script takes the user inputs, breaks them down to find out the "intents", "context",and "entities" in the user input and then passes these to the back end for running the necessary operations to generate the response.

(3) Back-end:

This is the part where we have either a database or some active api or something else. This is basically the part where, the already processed input from user comes and triggers specific business processes; all ultimately boiling down to create a response. 

Finally the response then comes from the back-end and gets through the NLP layer again to transform the response into acceptable chat format and then finally the chatbot "replies" to the user.

Let's go through this process with a basic chatbot available at a bank's site. For example, consider that you land on the home page of your bank and there is this information chatbot present there. Now you ask the chatbot,"what are home loan options?" 

See here you are using the front-end of the chatbot and your user response "what are home loan options?" reaches the NLP layer. 

In NLP layer, the question is processed by machine learning models and the models detect that "home loan" entity is asked about. It also understands that the user wants to know "options" which is the intent. Then these two things are passed back to probably a company API, which queries the company database about generic public information for home loan varieties. 

Probably a site or a pre-stored faq link is generated as a result of that query; which is now passed back to the NLP layer. The NLP layer forms a acceptable chat by adding the link to a pre-formatted sentence like "here are the options you can opt for: <link>"

And this sentence is then produced by the chat bot. 

So this is how a chatbot works in general. But probably you have already raised your eyebrows and be asking like, "thats all good and nice but what are intents and those other terminologies?" Before that, let's

Create a Basic Chatbot using dialogFlow:

In this section we will create a basic chatbot which schedules appointment for you in google's dialogflow tool. First,

(1) sign in to dialogflow

(2) Then go to the create agent option from the left side's drop down option, and click the create agent like this below pic.

(3) give a name to the agent; and create it. On doing so, you will see that the button will go into working for sometime, and then it will be done; as well as two intents will open up; which are:

(a) welcome intent: this is an intent for welcoming the user by default.

(b) default fallback intent: this is an intent for the bot to fall back whenever it doesn't understand the particular user response.

(4) You can test out the bot at any time now using the available console in the right side like this.

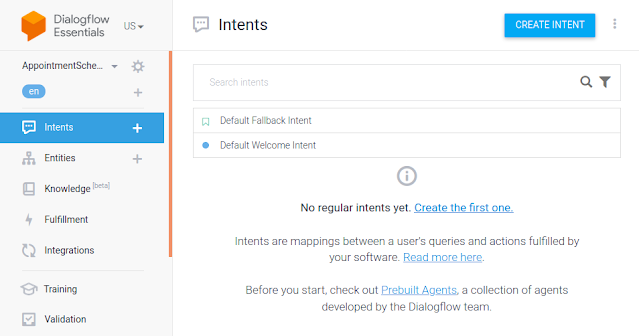
(5) Now, once you create this default bot, the obvious next bit is to create intents. So to create an intent, I will give you a basic sense what intent is. Intent is basically a classification of user responses, like a category. For different responses types or action types, we create different intents like this. In this bit, we will create one intent. For creating a new intent, click the intents option from left, and the screen will look something like this:

intent creation in dialogflow interface picture

Now, once you press "create intent" a new page opens like this:

So as you can see, there are these following things you will have to enter,

(1) intent name (2) contexts (3) events
(4) training phrases (5) Actions and parameters
(6) Responses (7) Fulfillment

Now, a lot of these are a bit complex things, so I will briefly provide the dialogflow's description for each of the item names.

what is context?

Contexts represent the current context of a user's request. This is helpful for differentiating phrases which may be vague or have different meanings depending on the user’s preferences, geographic location, the current page in an app, or the topic of conversation. Contexts can be used to structure non-linear conversations.

what is events?

Events help trigger the intent from non-verbal signals.
Events allow you to invoke an intent based on a non-verbal signal, such as a button click, or the start of a new conversation with a bot. Events can be used by external services to trigger Dialogflow intents, for example the Google Assistant's built-in intents.

what is training phrases?

Training phrases train the intent with what your users will say
Provide examples of how users will express their intent in natural language. Adding numerous phrases with different variations and parameters will improve the accuracy of intent matching.

what are actions and parameters?

Parameters are specific values extracted from a user's request when entities are matched. The values captured by parameters can be used in fulfillment, or in building a response. If you mark parameters as required, Dialogflow will prompt the user if their values were not extracted from their initial request.

what is fulfillment?

This is where basically you call a web service to connect your back-end with this chatbot. You can send intent, parameters and context to your Cloud function or a web service. Execute necessary logic and respond back with a written, spoken or visual response.
 
So now that all these basic definitions are down, we will proceed to create a simple intent for scheduling an event in our current bot.
 
For now, we will just use the training phrases feature. In training phrases, you can just press add phrases, and then add example user responses. This looks something like below:add training phrases in dialogflow user console
Now in each response, the system detects entities on its own. You can also select a word; and a entity list pops up like below:
dialogflow entity drop list to choose and set entity for a word

where you can select the entity you want to assign. Here we added the 3 examples like this and their entities and resolved values got stored like this. These examples are enough for training our model to resolve this intent.
Now, we will add responses. In responses, you can cite back the intents from user input by using $( dollar) sign. So here we are writing that, you are set for $time at $date. which will automatically replace the values from user input. We also put a more generic response as a variant. You can add as many variant as you want here. 
Now save the intent and try out the console. The intent should be ready and you should get a response now!
intent for time and response all set in dialogflow


Now you may think that we are done, but we are just getting started. Think of a scenario, where you just tell "set an appointment". The current bot will go to its fallback intent, as it will not find the entities in the user response and thus the intent will not be anymore as appointment schedule. But in this case, we take an approach which is called slot filling.
slot filling is nothing but creating action and parameters; to ensure that for a particular intent, the entities required are fetched correctly.
 
Here our required parameters are date and time. That's why open the action and parameters section and set both as required. You will see that there is a place to provide a prompt for asking these parameters as well. Fill these as desired questions for asking the parameter values. Now, once you are done filling these, save the intent once more. 
It will say working for a sec and then it will save the intent.
slot filling image for dialogueflow action and parameters
 
Now, test your bot. When you ask set an appointment, it will keep asking you for the parameters until you give it the parameters; and then finally reply you the appointment completion info. 
 
This completes the creation of your bot. I am skipping the part of enabling web demo; but you can continue here to complete that. 

So this was our base demo of creating a simple chatbot. Now we will dig into more details of the specific components of a chatbot.

This concludes the first part of this series. In the next part of the series, we will discuss Intent and her friends: inside the kitchen of chatbot. Stay tuned for the next part and thanks for reading this part!

Comments

Popular posts from this blog

Tinder bio generation with OpenAI GPT-3 API

Introduction: Recently I got access to OpenAI API beta. After a few simple experiments, I set on creating a simple test project. In this project, I will try to create good tinder bio for a specific person.  The abc of openai API playground: In the OpenAI API playground, you get a prompt, and then you can write instructions or specific text to trigger a response from the gpt-3 models. There are also a number of preset templates which loads a specific kind of prompt and let's you generate pre-prepared results. What are the models available? There are 4 models which are stable. These are: (1) curie (2) babbage (3) ada (4) da-vinci da-vinci is the strongest of them all and can perform all downstream tasks which other models can do. There are 2 other new models which openai introduced this year (2021) named da-vinci-instruct-beta and curie-instruct-beta. These instruction models are specifically built for taking in instructions. As OpenAI blog explains and also you will see in our

Can we write codes automatically with GPT-3?

 Introduction: OpenAI created and released the first versions of GPT-3 back in 2021 beginning. We wrote a few text generation articles that time and tested how to create tinder bio using GPT-3 . If you are interested to know more on what is GPT-3 or what is openai, how the server look, then read the tinder bio article. In this article, we will explore Code generation with OpenAI models.  It has been noted already in multiple blogs and exploration work, that GPT-3 can even solve leetcode problems. We will try to explore how good the OpenAI model can "code" and whether prompt tuning will improve or change those performances. Basic coding: We will try to see a few data structure coding performance by GPT-3. (a) Merge sort with python:  First with 200 words limit, it couldn't complete the Write sample code for merge sort in python.   def merge(arr, l, m, r):     n1 = m - l + 1     n2 = r- m       # create temp arrays     L = [0] * (n1)     R = [0] * (n

What is Bort?

 Introduction: Bort, is the new and more optimized version of BERT; which came out this october from amazon science. I came to know about it today while parsing amazon science's news on facebook about bort. So Bort is the newest addition to the long list of great LM models with extra-ordinary achievements.  Why is Bort important? Bort, is a model of 5.5% effective and 16% total size of the original BERT model; and is 20x faster than BERT, while being able to surpass the BERT model in 20 out of 23 tasks; to quote the abstract of the paper,  ' it obtains performance improvements of between 0 . 3% and 31%, absolute, with respect to BERT-large, on multiple public natural language understanding (NLU) benchmarks. ' So what made this achievement possible? The main idea behind creation of Bort is to go beyond the shallow depth of weight pruning, connection deletion or merely factoring the NN into different matrix factorizations and thus distilling it. While methods like knowle